在开发中mybatis作为一个持久化的工具,它的重要性可想而知。本文将为您介绍mybatis中的一级缓存和二级缓存,以及它们各自的实现方法。
mybatis缓存
mybatis作为一个流行的持久化工具,缓存必然是缺少不了的组件。通过这篇文章,就让我们来了解一下mybatis的缓存。
mybatis缓存类型
说起mybatis的缓存,了解过的同学都知道,mybatis中可以有两种缓存类型:
- 第一种,我们通常称为以及缓存,或者sqlSession级别的缓存,这种缓存是mybatis自带的,如果mapper中的配置都是默认的话,那么一级缓存也是默认开启的。
- 第二种,就是非sqlSession级别的缓存了,我们通常称为二级缓存,mybatis中的二级缓存需要实现Cache接口,并且配置在mapper中,要先开启的话,需要一些配置,下面我们会详细说到。
一级缓存
作为mybatis自带的缓存,我们通过代码来分析一下其原理。
首先,我们来看下一级缓存的效果。
测试代码:
@Test
public void test_Cache() throws Exception {
    InputStream input = Resources.getResourceAsStream("mybatis-config.xml");
    SqlSessionFactory factory = new SqlSessionFactoryBuilder().build(input);
    SqlSession sqlSession = factory.openSession();
    UserMapper mapper = sqlSession.getMapper(UserMapper.class);
    System.out.println("the first query : ");
    mapper.queryAllUsers();
    System.out.println("====================================");
    System.out.println("the second query : ");
    mapper.queryAllUsers();
    sqlSession.commit();
}
mapper配置如下,我们采用默认配置:
<select id="queryAllUsers" resultType="User">
    select * from hwc_users
</select>
运行结果如下:
Created connection 1191654595.
Setting autocommit to false on JDBC Connection [com.mysql.jdbc.JDBC4Connection@470734c3]
==> Preparing: select * from hwc_users
==> Parameters:
<== Columns: id, name, age, email
<== Row: 1, 胡文超, 35, [email protected]
<== Row: 2, 胡文超, 35, [email protected]
<== Row: 3, 胡文超, 35, [email protected]
<== Row: 4, 胡文超, 35, [email protected]
<== Row: 5, 胡文超, 35, [email protected]
<== Row: 6, 胡文超, 35, [email protected]
<== Row: 7, 胡文超, 35, [email protected]
<== Row: 8, 胡文超, 35, [email protected]
<== Row: 9, 胡文超, 35, [email protected]
<== Total: 9
====================================
the second query :
Cache Hit Ratio [com.huwc.mapper.UserMapper]: 0.0Process finished with exit code 0
从上述结果可以看到,第二次查询并没有从数据库获取,并且没有从二级缓存中获取,由此可见,默认配置情况下,同一个sqlSession中会默认使用mybatis的一级缓存。
下面,我们从mybatis源码来看一下:
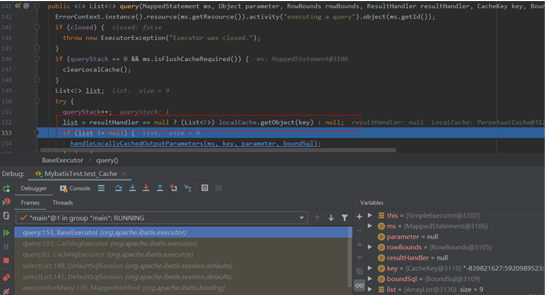
从上面的代码中,我们可以看到:一级缓存是在BaseExecutor中命中的,BaseExecutor中的localCache属性应该就是用来存储查询结果的。
localCache的定义代码如下:
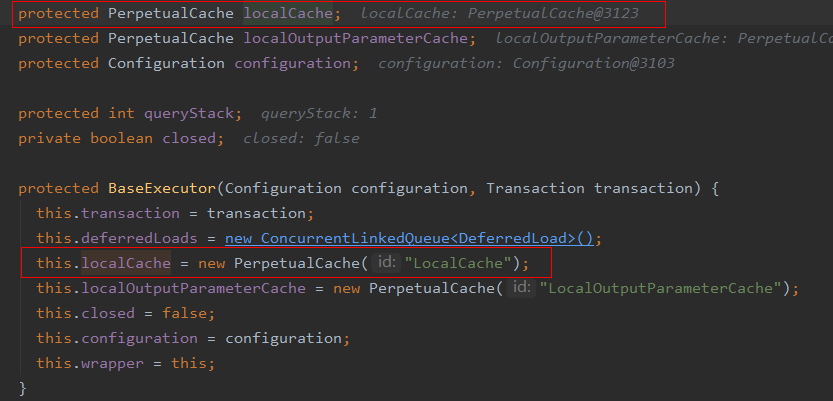

从上述代码可以看出:
BaseExecutor中集成了一级缓存,一级缓存为PerpetualCache(永久缓存?)的对象,其也是实现了Cache接口的对象,并且其存储结果就是简单的HashMap。
并且从代码上来看,一级缓存是无法禁止的。但是如果一个查询,我们就是不想让其从缓存中获取,必须从数据库查询,那我们岂不是无法处理了?
答案必然是否定的,我们从代码中可以看到:虽然一级缓存无法跳过,但是我们可以将缓存中数据进行清除处理,这样一级缓存中就获取不到结果集了:

如何让mybatis每次查询都flush缓存结果集呢?答案是通过mapper配置中的flushCache属性来处理:
<select id="queryAllUsers" resultType="User" flushCache="true">
    select * from hwc_users
</select>
加上这个属性后,我们来看下程序执行结果:
Created connection 1191654595.
Setting autocommit to false on JDBC Connection [com.mysql.jdbc.JDBC4Connection@470734c3]
==> Preparing: select * from hwc_users
==> Parameters:
<== Columns: id, name, age, email
<== Row: 1, 胡文超, 35, [email protected]
<== Row: 2, 胡文超, 35, [email protected]
<== Row: 3, 胡文超, 35, [email protected]
<== Row: 4, 胡文超, 35, [email protected]
<== Row: 5, 胡文超, 35, [email protected]
<== Row: 6, 胡文超, 35, [email protected]
<== Row: 7, 胡文超, 35, [email protected]
<== Row: 8, 胡文超, 35, [email protected]
<== Row: 9, 胡文超, 35, [email protected]
<== Total: 9
====================================
the second query :
Cache Hit Ratio [com.huwc.mapper.UserMapper]: 0.0
==> Preparing: select * from hwc_users
==> Parameters:
<== Columns: id, name, age, email
<== Row: 1, 胡文超, 35, [email protected]
<== Row: 2, 胡文超, 35, [email protected]
<== Row: 3, 胡文超, 35, [email protected]
<== Row: 4, 胡文超, 35, [email protected]
<== Row: 5, 胡文超, 35, [email protected]
<== Row: 6, 胡文超, 35, [email protected]
<== Row: 7, 胡文超, 35, [email protected]
<== Row: 8, 胡文超, 35, [email protected]
<== Row: 9, 胡文超, 35, [email protected]
<== Total: 9Process finished with exit code 0
可以看到,第二次查询也检索了数据库来获取结果。
一级缓存就说到这里吧,下面我们来看看二级缓存。
二级缓存
mybatis的二级缓存是需要借助第三方的缓存来实现,常用的有ehcache或者redis,其存储类型不同,但是在mybatis中的使用方式是一样的,简单处理,我们使用ehcache来说明。
通常来说,在mybatis中启用二级缓存,我们需要以下的步骤:
1、在项目中引入ehcache模块和mybatis-ehcache模块
2、在项目中加如ehcache配置文件
3、在mybatis配置文件中我们需要在setting中配置cacheEnabled属性;
4、在mapper配置文件中配置cache属性,并指定缓存的实现类;
5、在statement中配置useCache属性为”true“
第一步:首先我们在项目中引入相关模块:
<dependency>
    <groupId>net.sf.ehcache</groupId>
    <artifactId>ehcache</artifactId>
    <version>2.10.0</version>
</dependency>
<dependency>
    <groupId>org.mybatis.caches</groupId>
    <artifactId>mybatis-ehcache</artifactId>
    <version>1.2.1</version>
</dependency>
第二步:我们从网上抄一个ehcache的配置文件:ehcache.xml
<?xml version="1.0" encoding="UTF-8"?>
<ehcache xmlns:xsi="http://www.w3.org/2001/XMLSchema-instance"
         xsi:noNamespaceSchemaLocation="http://ehcache.org/ehcache.xsd"
         updateCheck="false">
    <diskStore path="java.io.tmpdir"/>
    <defaultCache eternal="false" maxElementsInMemory="1000" overflowToDisk="false" diskPersistent="false"
                  timeToIdleSeconds="0" timeToLiveSeconds="600" memoryStoreEvictionPolicy="LRU"/>
</ehcache>
第三步:配置mybatis属性
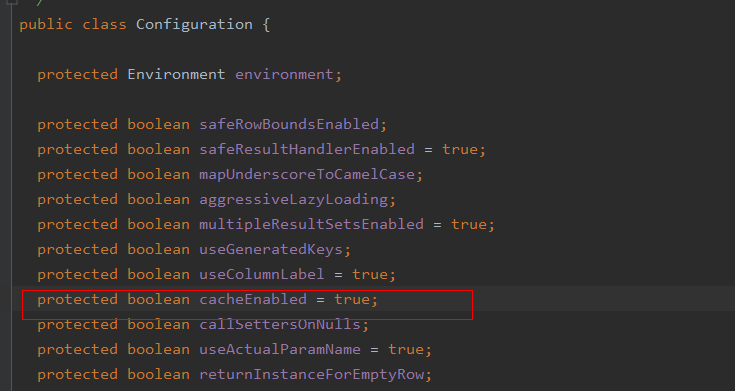
<setting name="cacheEnabled" value="true"/>
之前,我们说过,mybatis的配置,主要是为了初始化Configuration对象,从Configuration代码中我们看到,对应的属性默认值就是为true,因此,此步骤也可以跳过,直接采用mybatis的默认值:
第四步:配置mapper中的缓存属性:
<mapper namespace="com.huwc.mapper.UserMapper">
    <cache type="org.mybatis.caches.ehcache.EhcacheCache"></cache>
    ......
</mapper>
第五步:在statement中开启二级缓存:
<select id="queryAllUsers" resultType="User" useCache="true">
    select * from hwc_users
</select>
测试代码如下,为了屏蔽一级缓存,我们在第一次查询和第二次查询中将sqlSession进行关闭并重新open:
@Test
public void test_Cache() throws Exception {
    InputStream input = Resources.getResourceAsStream("mybatis-config.xml");
    SqlSessionFactory factory = new SqlSessionFactoryBuilder().build(input);
    SqlSession sqlSession = factory.openSession();
    UserMapper mapper = sqlSession.getMapper(UserMapper.class);
    System.out.println("the first query : ");
    mapper.queryAllUsers();
    sqlSession.close();
    sqlSession = factory.openSession();
    mapper = sqlSession.getMapper(UserMapper.class);
    System.out.println("====================================");
    System.out.println("the second query : ");
    mapper.queryAllUsers();
    sqlSession.commit();
}
执行结果如下:
Created connection 1191654595.
Setting autocommit to false on JDBC Connection [com.mysql.jdbc.JDBC4Connection@470734c3]
==> Preparing: select * from hwc_users
==> Parameters:
<== Columns: id, name, age, email
<== Row: 1, 胡文超, 35, [email protected]
<== Row: 2, 胡文超, 35, [email protected]
<== Row: 3, 胡文超, 35, [email protected]
<== Row: 4, 胡文超, 35, [email protected]
<== Row: 5, 胡文超, 35, [email protected]
<== Row: 6, 胡文超, 35, [email protected]
<== Row: 7, 胡文超, 35, [email protected]
<== Row: 8, 胡文超, 35, [email protected]
<== Row: 9, 胡文超, 35, [email protected]
<== Total: 9
Resetting autocommit to true on JDBC Connection [com.mysql.jdbc.JDBC4Connection@470734c3]
Closing JDBC Connection [com.mysql.jdbc.JDBC4Connection@470734c3]
Returned connection 1191654595 to pool.
====================================
the second query :
Cache Hit Ratio [com.huwc.mapper.UserMapper]: 0.5Process finished with exit code 0
从结果中,我们可以看到,二级缓存起到了作用,并且命中率为0.5(查询两次,一次命中)
下面,我们从mybatis的代码来看下二级缓存使用:
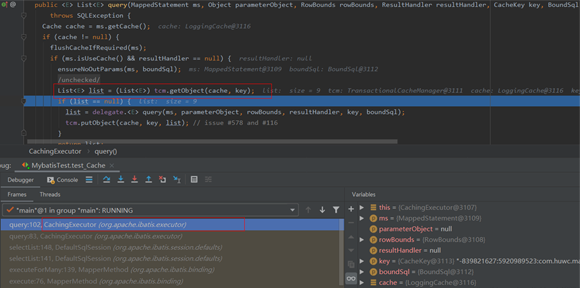
代码截图中,我们看到,二级缓存是在CacheExecutor中进行的调用,并且最终使用的就是我们的Ehcache:
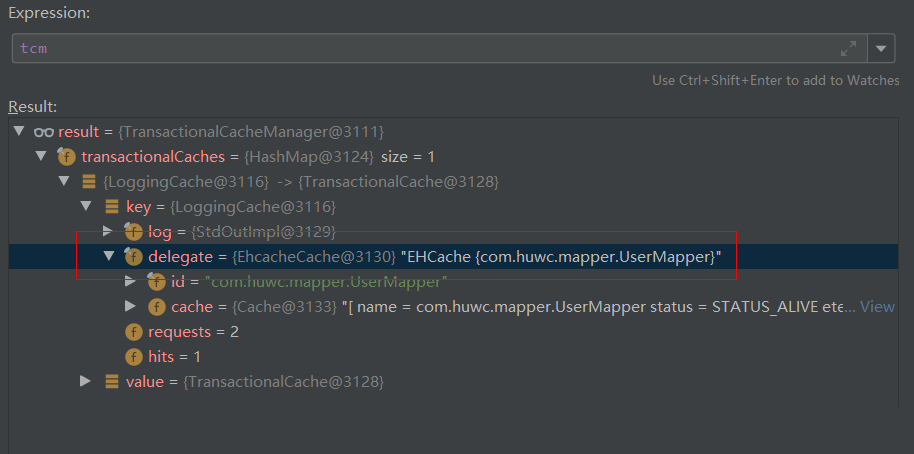
并且,如果我们在mapper中的statement中也配置了flushCache,那么二级缓存也将在查询前被清除掉,我们通过测试来看以下:
<select id="queryAllUsers" resultType="User" flushCache="true" useCache="true">
    select * from hwc_users
</select>
执行结果如下:
Created connection 1191654595.
Setting autocommit to false on JDBC Connection [com.mysql.jdbc.JDBC4Connection@470734c3]
==> Preparing: select * from hwc_users
==> Parameters:
<== Columns: id, name, age, email
<== Row: 1, 胡文超, 35, [email protected]
<== Row: 2, 胡文超, 35, [email protected]
<== Row: 3, 胡文超, 35, [email protected]
<== Row: 4, 胡文超, 35, [email protected]
<== Row: 5, 胡文超, 35, [email protected]
<== Row: 6, 胡文超, 35, [email protected]
<== Row: 7, 胡文超, 35, [email protected]
<== Row: 8, 胡文超, 35, [email protected]
<== Row: 9, 胡文超, 35, [email protected]
<== Total: 9
Resetting autocommit to true on JDBC Connection [com.mysql.jdbc.JDBC4Connection@470734c3]
Closing JDBC Connection [com.mysql.jdbc.JDBC4Connection@470734c3]
Returned connection 1191654595 to pool.
====================================
the second query :
Cache Hit Ratio [com.huwc.mapper.UserMapper]: 0.5
Opening JDBC Connection
Checked out connection 1191654595 from pool.
Setting autocommit to false on JDBC Connection [com.mysql.jdbc.JDBC4Connection@470734c3]
==> Preparing: select * from hwc_users
==> Parameters:
<== Columns: id, name, age, email
<== Row: 1, 胡文超, 35, [email protected]
<== Row: 2, 胡文超, 35, [email protected]
<== Row: 3, 胡文超, 35, [email protected]
<== Row: 4, 胡文超, 35, [email protected]
<== Row: 5, 胡文超, 35, [email protected]
<== Row: 6, 胡文超, 35, [email protected]
<== Row: 7, 胡文超, 35, [email protected]
<== Row: 8, 胡文超, 35, [email protected]
<== Row: 9, 胡文超, 35, [email protected]
<== Total: 9Process finished with exit code 0
总结:
1、mybatis的缓存处理,都交由Executor来处理,一级缓存是由BaseExecutor处理,二级缓存则由CacheExecutor处理;
2、statement中如果配置了flushCache为true,那么不论是一级缓存还是二级缓存都会失效;
3、要启用二级缓存,需要在statement中配置useCache为true。
看到这里,对Mybatis一级缓存与二级缓存的实现方法也已经有了了解。想要了解更多有关于mybatis一级缓存和二级缓存的内容请搜索W3Cschool以前的文章或继续浏览下面的相关文章希望大家以后多多支持W3Cschool!


