Flutter实战 登录页
2021-03-09 15:14 更新
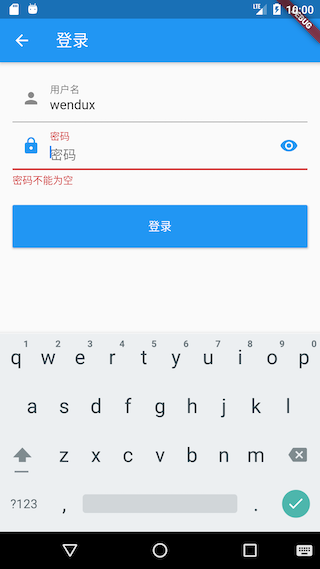
我们说过 Github 有多种登录方式,为了简单起见,我们只实现通过用户名和密码登录。在实现登录页时有四点需要注意:
- 可以自动填充上次登录的用户名(如果有)。
- 为了防止密码输入错误,密码框应该有开关可以看明文。
- 用户名或密码字段在调用登录接口前有本地合法性校验(比如不能为空)。
- 登录成功后需更新用户信息。
实现代码如下:
import '../index.dart';


class LoginRoute extends StatefulWidget {
  @override
  _LoginRouteState createState() => _LoginRouteState();
}


class _LoginRouteState extends State<LoginRoute> {
  TextEditingController _unameController = new TextEditingController();
  TextEditingController _pwdController = new TextEditingController();
  bool pwdShow = false; //密码是否显示明文
  GlobalKey _formKey = new GlobalKey<FormState>();
  bool _nameAutoFocus = true;


  @override
  void initState() {
    // 自动填充上次登录的用户名,填充后将焦点定位到密码输入框
    _unameController.text = Global.profile.lastLogin;
    if (_unameController.text != null) {
      _nameAutoFocus = false;
    }
    super.initState();
  }


  @override
  Widget build(BuildContext context) {
    var gm = GmLocalizations.of(context);
    return Scaffold(
      appBar: AppBar(title: Text(gm.login)),
      body: Padding(
        padding: const EdgeInsets.all(16.0),
        child: Form(
          key: _formKey,
          autovalidate: true,
          child: Column(
            children: <Widget>[
              TextFormField(
                  autofocus: _nameAutoFocus,
                  controller: _unameController,
                  decoration: InputDecoration(
                    labelText: gm.userName,
                    hintText: gm.userNameOrEmail,
                    prefixIcon: Icon(Icons.person),
                  ),
                  // 校验用户名(不能为空)
                  validator: (v) {
                    return v.trim().isNotEmpty ? null : gm.userNameRequired;
                  }),
              TextFormField(
                controller: _pwdController,
                autofocus: !_nameAutoFocus,
                decoration: InputDecoration(
                    labelText: gm.password,
                    hintText: gm.password,
                    prefixIcon: Icon(Icons.lock),
                    suffixIcon: IconButton(
                      icon: Icon(
                          pwdShow ? Icons.visibility_off : Icons.visibility),
                      onPressed: () {
                        setState(() {
                          pwdShow = !pwdShow;
                        });
                      },
                    )),
                obscureText: !pwdShow,
                //校验密码(不能为空)
                validator: (v) {
                  return v.trim().isNotEmpty ? null : gm.passwordRequired;
                },
              ),
              Padding(
                padding: const EdgeInsets.only(top: 25),
                child: ConstrainedBox(
                  constraints: BoxConstraints.expand(height: 55.0),
                  child: RaisedButton(
                    color: Theme.of(context).primaryColor,
                    onPressed: _onLogin,
                    textColor: Colors.white,
                    child: Text(gm.login),
                  ),
                ),
              ),
            ],
          ),
        ),
      ),
    );
  }


  void _onLogin() async {
    // 提交前,先验证各个表单字段是否合法
    if ((_formKey.currentState as FormState).validate()) {
      showLoading(context);
      User user;
      try {
        user = await Git(context).login(_unameController.text, _pwdController.text);
        // 因为登录页返回后,首页会build,所以我们传false,更新user后不触发更新
        Provider.of<UserModel>(context, listen: false).user = user;
      } catch (e) {
        //登录失败则提示
        if (e.response?.statusCode == 401) {
          showToast(GmLocalizations.of(context).userNameOrPasswordWrong);
        } else {
          showToast(e.toString());
        }
      } finally {
        // 隐藏loading框
        Navigator.of(context).pop();
      }
      if (user != null) {
        // 返回
        Navigator.of(context).pop();
      }
    }
  }
}
代码很简单,关键地方都有注释,不再赘述,下面我们看一下运行效果,如图15-5所示。

以上内容是否对您有帮助:

 免费AI编程助手


更多建议: