Moralis 与Node.js连接
安装 Moralis SDK
运行以下命令安装 Moralis SDK,您可以使用npm或者yarn
npm install moralisyarn add moralis
SDK 初始化
您需要在 node.js 中使用以下语法初始化 Moralis SDK:
创建文件 index.ts 并添加以下代码:
/* import moralis */
const Moralis = require("moralis/node");

/* Moralis init code */
const serverUrl = "YOUR-SERVER-URL";
const appId = "YOUR-APP-ID";
const masterKey = "YOUR-MASTER-KEY";

await Moralis.start({ serverUrl, appId, masterKey });
使用 masterKey,您可以直接访问 Moralis 仪表板,无需进行身份验证。
使用主密钥,您可以直接从后端使用 SDK 使用您 Moralis 帐户的
API、RPC节点和其他功能。
请记住永远不要泄露您的主密钥,因为一旦有人获得您的主密钥,他们就可以完全访问您的 Moralis 帐户。
数据库查询
保存数据
要使用数据复制粘贴以下代码来保存对象:
创建一个文件 SaveData.ts 并添加以下代码:
const SaveData = async () => {
  await Moralis.start({ serverUrl, appId, masterKey });

  const Monster = Moralis.Object.extend("Monster");
  const monster = new Monster();

  monster.set("strength", 1024);
  monster.set("ownerName", "Aegon");
  monster.set("canFly", true);

  await monster.save();
};

SaveData();
在终端中运行以下命令:
ts-node SaveData.ts
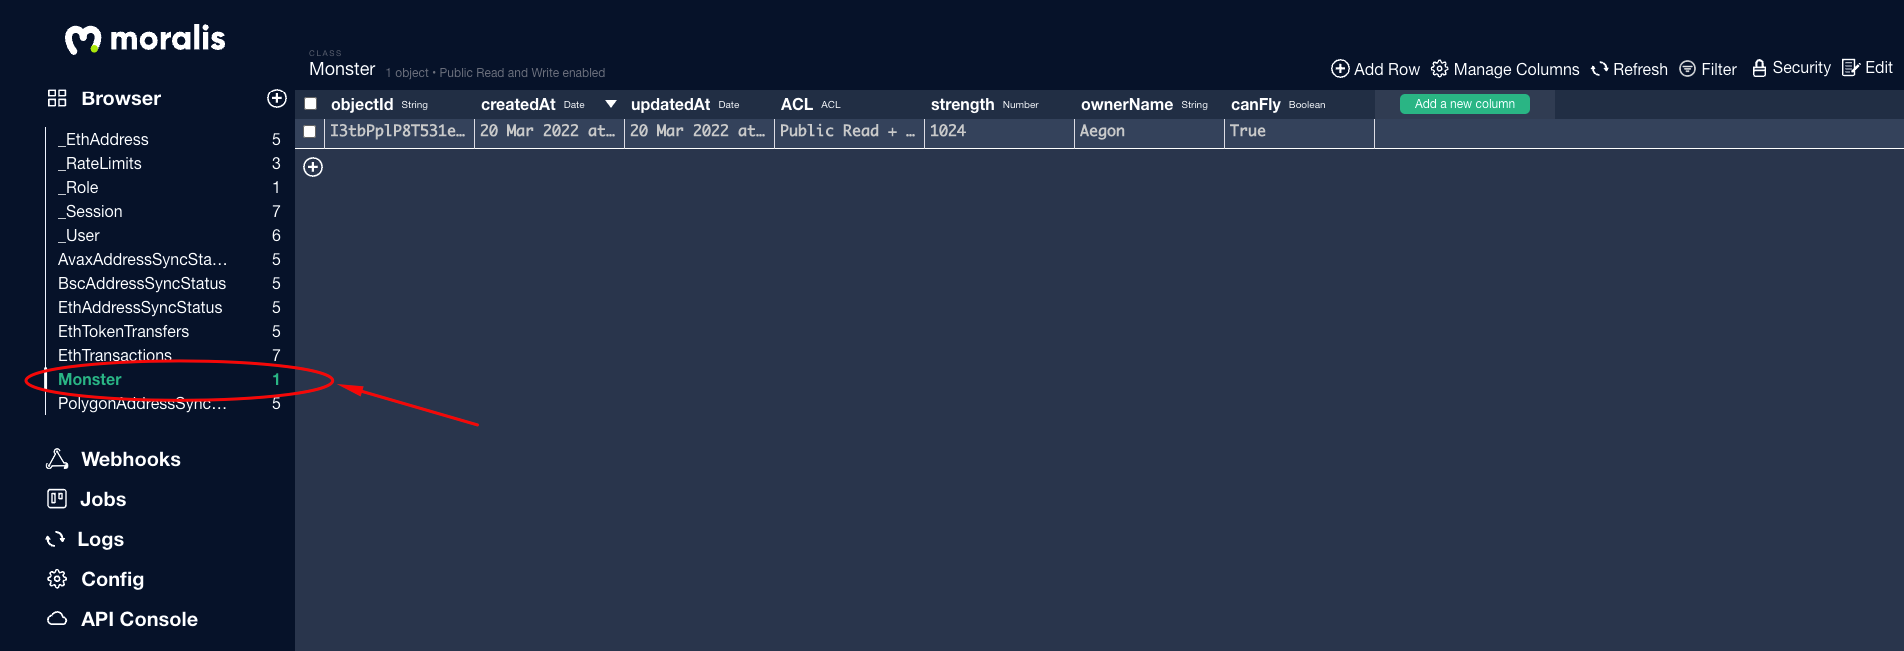
转到您的 Moralis 仪表板,您将看到保存在数据库中的数据:

Query
创建一个文件 FindQuery.ts 并添加以下代码:
const FindQuery = async () => {
  const Monster = Moralis.Object.extend("Monster");
  const query = new Moralis.Query("Monster");

  const results = await query.find();
  console.log(results);
};
运行:
ts-node FindQuery.ts
在您的控制台中,您将看到:
[
  ParseObjectSubclass {
    className: 'Monster',
    _objCount: 0,
    id: 'I3tbPplP8T531e0vgBrFVj5O'
  }
]
Live Query
订阅查询以在查询结果集中的数据发生更改时获取实时警报。
创建文件 LiveQuery.ts 在文件中添加以下代码:
const LiveQuery = async () => {
  const Monster = Moralis.Object.extend("Monster");
  const query = new Moralis.Query(Monster);

  let subscription = await query.subscribe();
  console.lIog(subscription);
};

LiveQuery();
运行:
ts-node LiveQuery.ts在您的控制台中,您将看到:
Subscription {
  _events: [Object: null prototype] { error: [Function (anonymous)] },
  _eventsCount: 1,
  _maxListeners: undefined,
  id: 1,
  query: ParseQuery {
    className: 'Monster',
    _where: {},
    _include: [],
    _exclude: [],
    _select: undefined,
    _limit: -1,
    _skip: 0,
    _count: false,
    _order: undefined,
    _readPreference: null,
    _includeReadPreference: null,
    _subqueryReadPreference: null,
    _queriesLocalDatastore: false,
    _localDatastorePinName: null,
    _extraOptions: {},
    _hint: undefined,
    _explain: undefined,
    _xhrRequest: { task: null, onchange: [Function: onchange] }
  },
  sessionToken: undefined,
  subscribePromise: Promise {
    undefined,
    resolve: [Function (anonymous)],
    reject: [Function (anonymous)]
  },
  subscribed: true,
  [Symbol(kCapture)]: false
}
使用Web3API
创建文件 Web3API.ts 并添加以下代码:
const serverUrl = "YOUR-SERVER-URL";
const appId = "YOUR-APP-ID";
const moralisSecret = "YOUR MORALIS SECRET";

const web3API = async () => {
  await Moralis.start({ serverUrl, appId, moralisSecret });

  const price = await Moralis.Web3API.token.getTokenPrice({
    address: "0xe9e7cea3dedca5984780bafc599bd69add087d56",
    chain: "bsc",
  });
  console.log(price);
};

web3API();使用moralisSecret,所有API 调用都直接转到API,而不是通过Moralis 服务器。
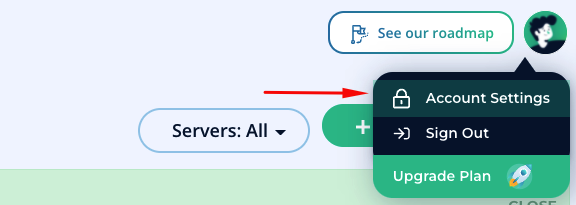
要获得moralisSecret,您需要进入帐户设置,如下图所示

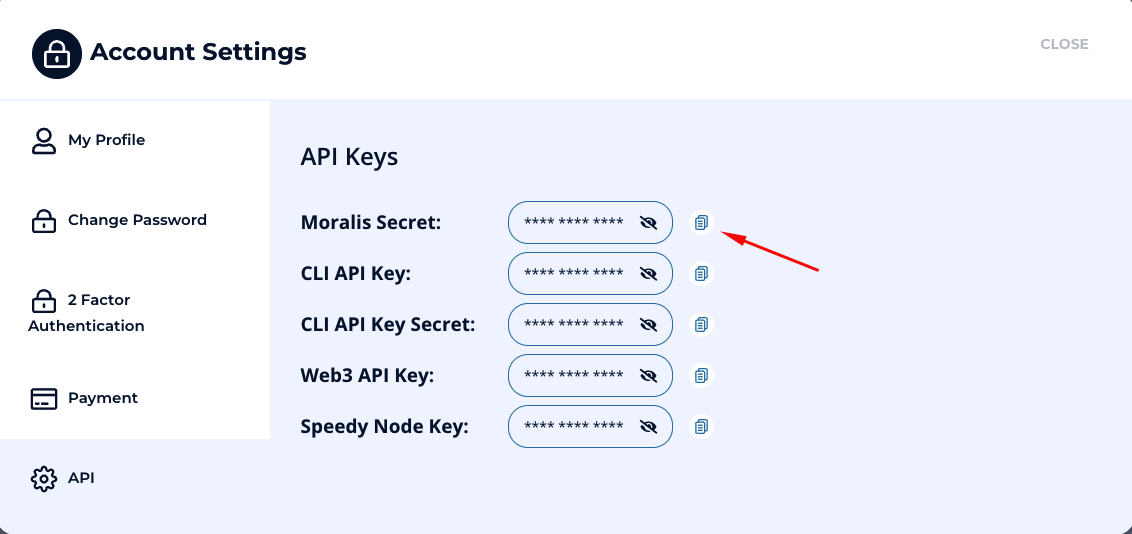
然后转到API并复制你的moralisSecret密钥

运行:
ts-node Web3API.ts您将看到以下结果:
{
  nativePrice: {
    value: '2492486316397403',
    decimals: 18,
    name: 'Binance Coin',
    symbol: 'BNB'
  },
  usdPrice: 1.000879782388469,
  exchangeAddress: '0xcA143Ce32Fe78f1f7019d7d551a6402fC5350c73',
  exchangeName: 'PancakeSwap v2'
}
使用私钥启用 Moralis
Moralis.Transfer
我们可以在后端使用私钥传输任何“native”| 'erc20' | 'erc721' | 'erc1155' tokens。
创建一个文件 tranx.ts 并添加以下代码:
const tranx = async () => {
  await Moralis.start({ serverUrl, appId, moralisSecret });

  // Enable web3
  await Moralis.enableWeb3({
    //BSC mainnet
    chainId: 0x38,
    privateKey: "YOUR-PRIVATE KEY",
  });

  // sending 0.5 DAI tokens with 18 decimals on BSC mainnet
  const options: Moralis.TransferOptions = {
    type: "erc20",
    amount: Moralis.Units.Token("0.5", 18),
    receiver: "0x93905fd3f9b8732015f2b3Ca6c16Cbcb60ECf895",
    contractAddress: "0x1AF3F329e8BE154074D8769D1FFa4eE058B1DBc3",
  };
  await Moralis.transfer(options).then((result) => {
    console.log(result);
  });
};

tranx();使用moralisSecret,所有API调用都直接转到API,而不是通过Moralis 服务器。
私钥不应暴露给前端或浏览器或云端,否则将导致资金损失
运行:
ts-node tranx.ts您将在终端中看到结果:
{
  nonce: 9,
  gasPrice: BigNumber { _hex: '0x012a05f200', _isBigNumber: true },
  gasLimit: BigNumber { _hex: '0x8d07', _isBigNumber: true },
  to: '0x1AF3F329e8BE154074D8769D1FFa4eE058B1DBc3',
  value: BigNumber { _hex: '0x00', _isBigNumber: true },
  data: '0xa9059cbb00000000000000000000000093905fd3f9b8732015f2b3ca6c16cbcb60ecf89500000000000000000000000000000000000000000000000006f05b59d3b20000',
  chainId: 56,
  v: 147,
  r: '0x2715e0d05fdf82f7e129c1d0608de4629d15fffa557d43339d78489d80f78a0f',
  s: '0x12ab674095e18b1e81525e30826b55ebcc24cddfceed855c26819aafdd4f78d3',
  from: '0x7094F8B1a2a1EeA360D79Be99bAeF18175aa30Ca',
  hash: '0xc53417f3f584680ad81046195c64edf59f8a2eb6826793765676ebe304f74760',
  type: null,
  confirmations: 0,
  wait: [Function (anonymous)]
}
Moralis.executeFunction
创建一个文件 execute.ts 并添加以下代码:
const execute = async () => {
  await Moralis.start({ serverUrl, appId, moralisSecret });

  // Enable web3
  await Moralis.enableWeb3({
    chainId: 0x1,
    privateKey:
      "afcf6a8d1a2b9e20bd322850afb28085693f436427fe8da3d0e40954cfb2d0dc",
  });

  const options = {
    // CAPSULE contract
    contractAddress: "0xfcb1315c4273954f74cb16d5b663dbf479eec62e",
    // calling tokenURI function
    functionName: "tokenURI",
    // contract ABI
    abi: [
      {
        inputs: [{ internalType: "uint256", name: "tokenId", type: "uint256" }],
        name: "tokenURI",
        outputs: [{ internalType: "string", name: "", type: "string" }],
        stateMutability: "view",
        type: "function",
      },
    ],
    // token URI of token ID 700
    params: { tokenId: 700 },
  };
  await Moralis.executeFunction(options).then((result) => {
    console.log(result);
  });
};

execute();使用moralisSecret,所有API调用都直接转到API,而不是通过Moralis 服务器。
运行:
ts-node execute.ts您将在终端中看到结果:
https://hatch.capsulehouse.io/api/metadata/700
从代码添加新地址同步
Sync and Watch Address 插件在底层调用了一个名为 watchXxxAddress 的云函数,其中“Xxx”是下表的链名。 这些云函数也可以直接从自己的代码中调用!
| Chain | Prefix |
| Ethereum Mainnet, Ropsten, Georli, Kovan, Local Devchain | Eth |
| Binance Smart Chain Mainnet, Testnet | Bsc |
| Polygon (Matic) Mainnet, Mumbai Testnet | Matic |
| Elrond | Erd |
创建文件watchAddr.ts并添加以下代码:
const watchAddr = async () => {
  await Moralis.start({ serverUrl, appId, masterKey });

  await Moralis.Cloud.run(
    "watchBscAddress",
    { address: "0x..." },
    { useMasterKey: true }
  ).then((result) => {
    console.log(result);
  });
};

watchAddr();
运行:
ts-node watchAddr.ts在终端中,您将看到:
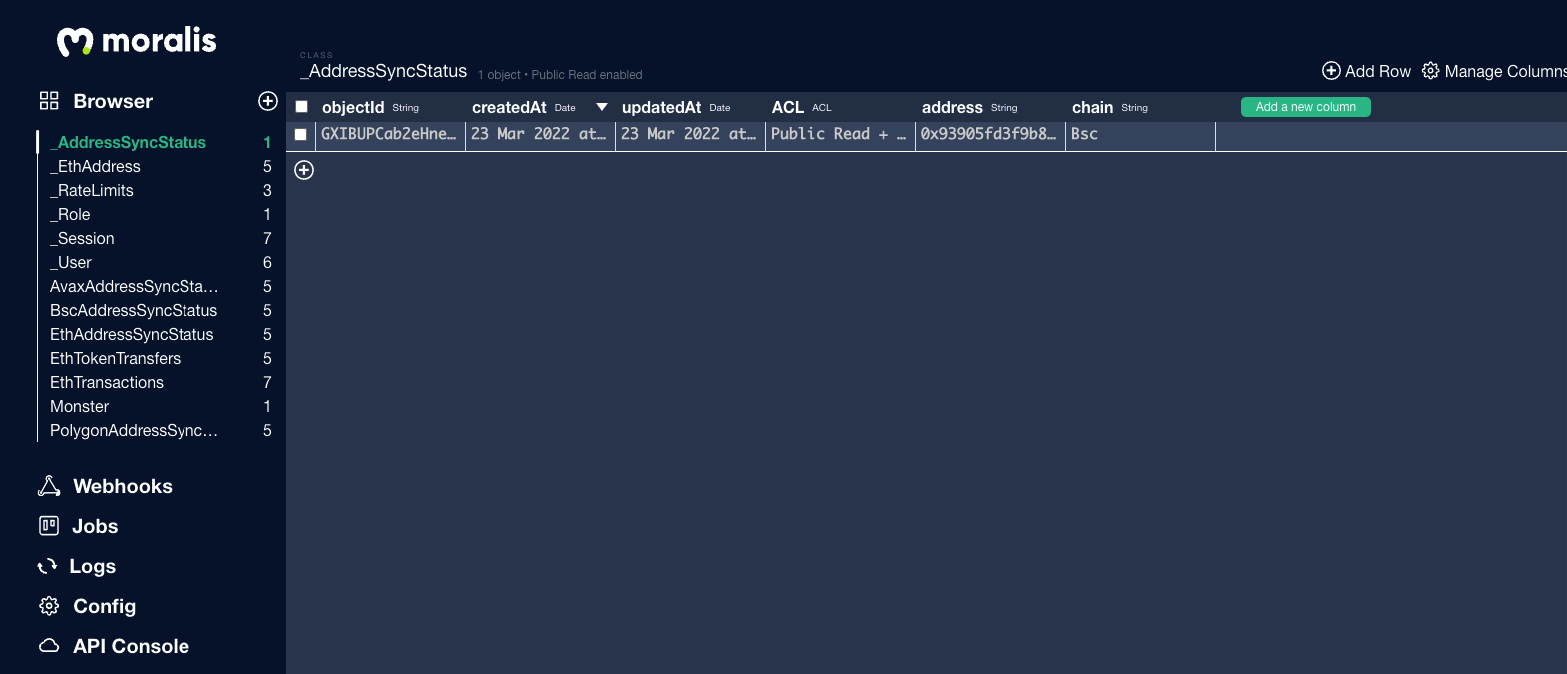
{ status: 200, data: { success: true, result: true } }交易数据存储在 Moralis Dashboard 中:

默认情况下,只有使用此云功能被监视的地址所做的新交易才会被添加到数据库中。 如果您还想为要观看的地址添加历史数据,可以添加 sync_historical:true
注意:监视地址函数在开始作业时不返回任何值。 它们仍然是异步的! 一旦 promise 返回同步的事务,它们应该在相应链的 XxxTransactions 表中。
从代码添加新的事件同步
Moralis Server 有一个特殊的云功能,称为 watchContractEvent(options)。 您可以使用主密钥调用它。
注意:目前通过代码创建的事件不会在管理 UI 中看到,您只能在数据库中看到它们。
创建文件 watchEvent.ts 并添加以下代码:
const watchEvent = async () => {
  await Moralis.start({ serverUrl, appId, masterKey });
  // code example of creating a sync event from cloud code
  let options = {
    chainId: "42",
    // UniswapV2Factory contract
    address: "0x5c69bee701ef814a2b6a3edd4b1652cb9cc5aa6f",
    topic: "PairCreated(address, address, address, uint256)",
    abi: {
      anonymous: false,
      inputs: [
        {
          indexed: true,
          internalType: "address",
          name: "token0",
          type: "address",
        },
        {
          indexed: true,
          internalType: "address",
          name: "token1",
          type: "address",
        },
        {
          indexed: false,
          internalType: "address",
          name: "pair",
          type: "address",
        },
        {
          indexed: false,
          internalType: "uint256",
          name: "test",
          type: "uint256",
        },
      ],
      name: "PairCreated",
      type: "event",
    },
    limit: 500000,
    tableName: "UniPairCreated",
    sync_historical: false,
  };

  Moralis.Cloud.run("watchContractEvent", options, { useMasterKey: true }).then(
    (result) => {
      console.log(result);
    }
  );
};

watchEvent();
运行:
ts-node watchEvent.ts
在终端中,您将看到:
{ success: true }
事件数据成功存储在 Moralis Dashboard 中


 免费AI编程助手


更多建议: